
We recently relocated to a small duplex flat (double storey apartment for my American readers), forcing us to scale down on our possessions. In spite of the scaling down, I still landed up with more books than my rickety bookshelf can hold.
This called for some creativeness towards a new bookcase. The old one had its days and would be retired to the garage. And there was no money for a fancy bookcase from a store.
Being an engineer by profession, I looked around for a cheap or free CAD program to help with getting ideas and concepts on paper. A brief search on the internet found me downloading Sketchup®. A CAD package claimed by Trimble, the owners and suppliers of the software, to be the easiest way to draw in 3D.
 |
| The Sketchup 3D drawing |
Well, it is free and I found the claims to be well founded. Even for someone like me who grew up with a proper drawing board, this is an easy to use program.
So I set out and produced a couple of concepts, then refined them. I eventually settled on a fold-up or rather collapsible bookcase. The concept was to have the two sides holding up the shelves, but not fixed permanently. The sides are about the same width as the shelves and is a construction almost like a skeleton plank, if you will. Perhaps resembling a girder on a bridge. Very little materials used, but giving strength and stiffness against parallelogram distortion. The only glue used in the construction is for these two side struts.
 Some sawing is required. The struts are made from pine roof brandering which measures about 37mm x 37mm x 1,8m (roughly 1 ½” x1 ½” x 6 ft). The cross pieces are made from the strut material split in half lengthwise.
All the cuts were made using a radial arm saw and some temporary jigs and fences to allow for the diagonal cuts and basic safety. If you don't have access to such a saw, make friends with a local woodworker, cabinetmaker or builder. These people will help you for a small favour or a nominal amount.
Make sure that the cuts for the diagonal struts are lined up and do them simultaneously for each side. The raw struts will now become two pairs and you need to keep them that way. And remember to decide which way is up before paring the two sets of struts.
 The assembly of the struts is quite easy. You will need some ordinary wood glue and panel pins. Clamps would be a wonderful help too, but the panel pins would suffice. Assemble the two sides and allow the glue to dry overnight. If you live in warm climes, one to two hours would suffice, depending on the type of glue that you use.
The slots for the shelves are cut last when all the glue has cured and the two sides are nice and sturdily assembled. If you think about a surface finish on the wood for protection against dust and water/coffee spills, then allow for that in the width of the cuts for the shelves. I did not and paid a price in having to use a rasp to widen the cuts after painting the sides and shelves.
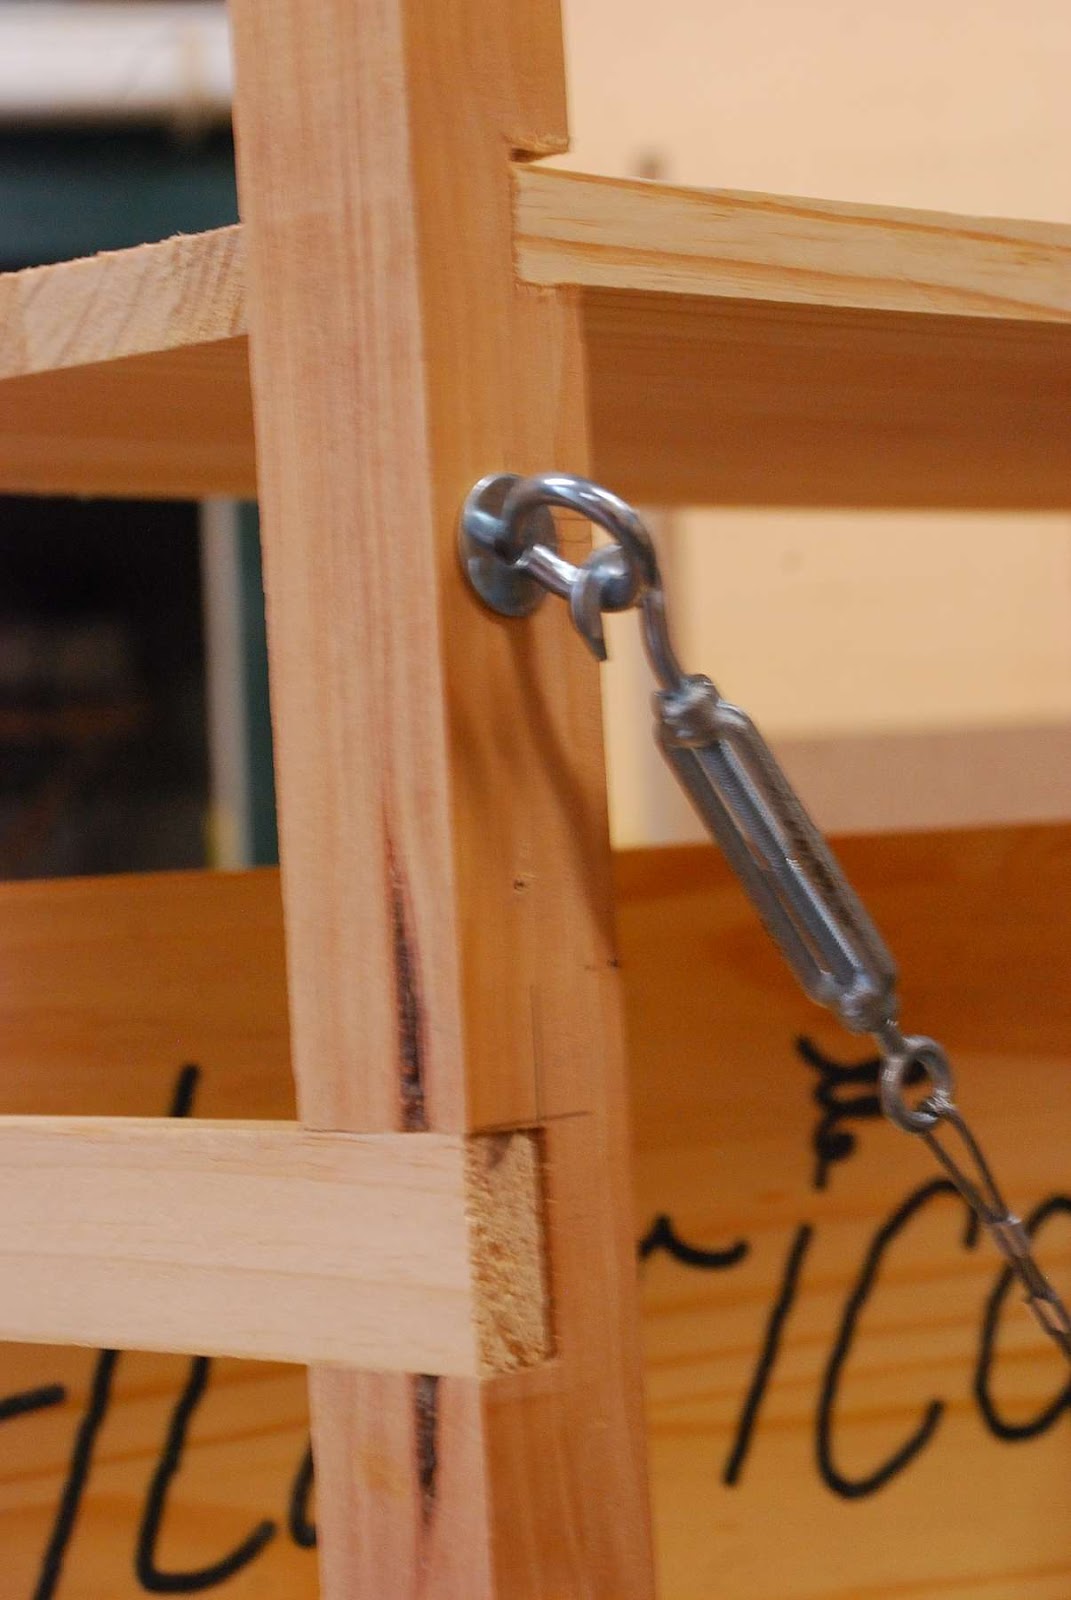
The bookcase is held together as an assembly with cables and turn-buckles. Two crossed cables at the back going from each top to opposite bottom strut will keep the
 |
| Struts layout |
So there it is: A bookcase held together by cables. Collapsible or fold-up, take your pick.
The turn-buckles are quite cheap at your local hardware store. Bear in mind that the turn-buckles need a certain reach from long to short, so check before you buy. I judged about 40-50mm (about 2 inches) to be good and I was just on the border. You need to work carefully here.
The cables are measured after fitting eye-bolts in their places. I bought the thinnest galvanised cable in the store. This is not for marine or outdoor use, so the use of stainless steel is an expensive overkill.
You will need twenty four ferrules, but buy more. Unless you have crimped them before, you will probably mess up a few. Make sure that you buy ones that fit the cable. And make very sure that you know how to crimp the ferrules on to the cable. I have lost fish in the middle of the ocean due to a bad crimp on the trace.
I opted to paint the bookcase. This then allowed me to use the very cheapest wood I could find. Scraps, in fact. Except for the shelves, where I bought laminated shelving. It is more expensive than chipboard, but I judged that the laminated planks would be stiffer and a bit stronger than the chipboard. And look nicer, even when painted.
 |
| Ensure cuts are not opposite struts |
Materials
1 x laminated pine shelving 15mm x 305mm x 2,4m
1 x laminated pine shelving 15mm x 305mm x 3,6m
6 x turn-buckles
15m x 1,5mm galvanised multi-strand cable
30 ferrules for the above cable
12 x eyebolts 6mm x 50mm
24 large washers, 6mm
12 nuts for the eye bolts
panel pins
cold glue
1 litre paint or varnish for the surface finish
Construction
Cut the planks into five equal lengths of 1,2 m nominal. The actual measurement is irrelevant, but the equal lengths are important.
Use two of the brandering poles for making the diagonal struts on the sides. The angles are not important. What is critical is that you have the diagonal and cross struts away from where the cuts for the shelves will be. This will prevent you from cutting through the vertical struts when the cuts for the shelves on the other side are made.
 |
| Check for adjustment |
while you insert the shelves. I drilled holes in the appropriate places and had the eye bolts already in place.
Fitting the cables and turn-buckles is the more tricky part of the assembly. You need to work very carefully. Remember to open up the turn-buckles before measuring the cable. Then allow some extra cable before the final crimp. This is the coarse adjustment. The turn-buckle reach is the fine adjustment.
I used two ferrules at each joint as I found that one ferrule tends to slip. The forces in the cables are not insignificant. Test each cable to ensure that you can unscrew the turn-buckles far enough to unhook them from the eye-bolts before you do the final crimp.
 |
| Check final assembly |
Once you are happy with all the lengths you can do the final crimping of the ferrules, trim the lazy ends of the cables and tighten up the
turn-buckles.
Voila, your book case is complete! Now dis-assemble the bookcase, remove all the eye-bolts and sand it down prior to the final surface finish. Once this is done you take the pieces to where you want the book case and assemble the bookcase in situ. And this one is light enough that even a petite girl will be able to move it around, no offense meant.
 |
| My friend's 75 kg test |
Authored by Johan Zietsman
Last updated on 2013-08-06


